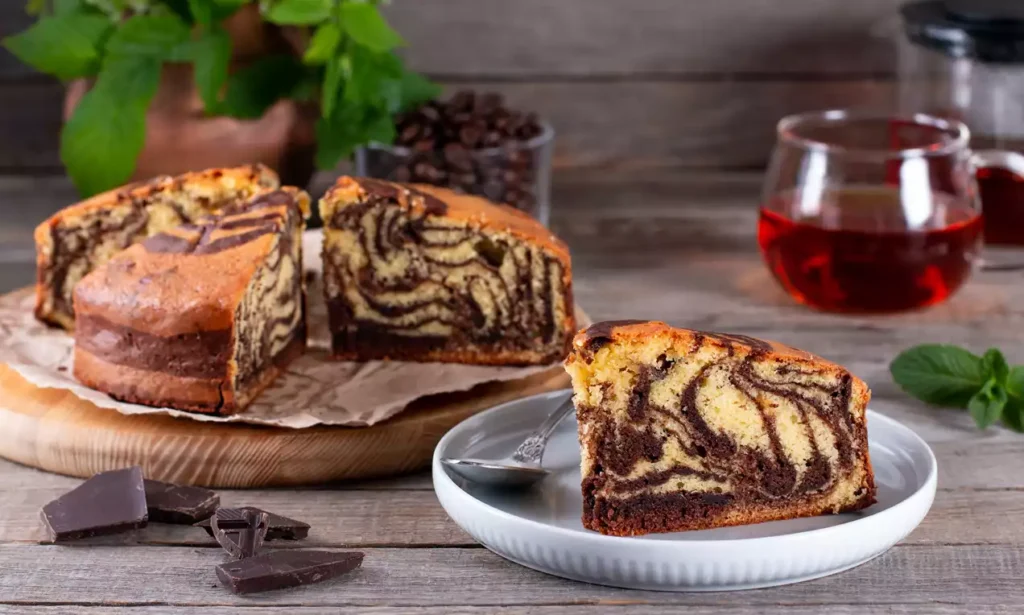
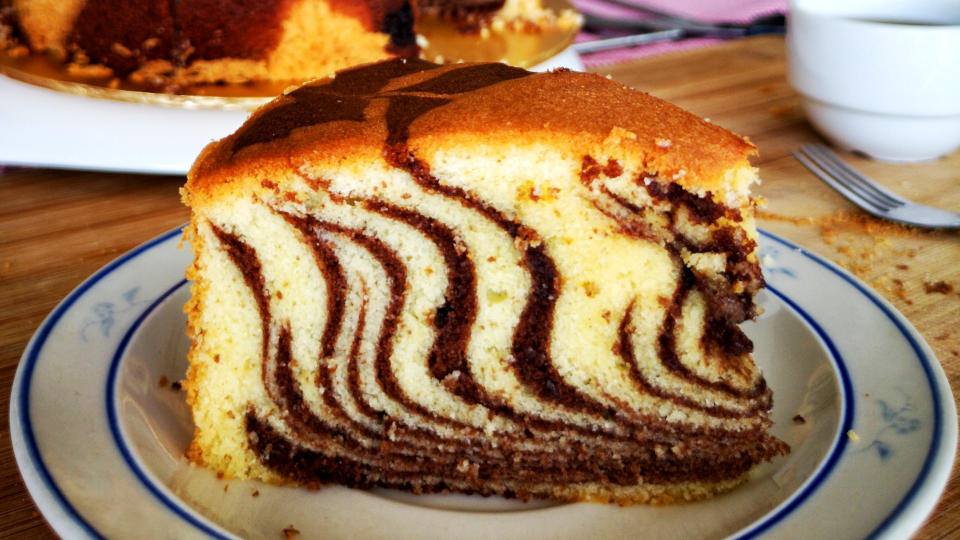
There’s something quietly magical about marble cake. Before you even take a bite, it draws you in visually, ribbons of deep chocolate swirling through golden vanilla like edible artwork. Every slice is slightly different, which makes serving it feel a little special each time.
Marble cake is one of those timeless desserts that bridges generations. It carries the warmth of homemade baking, often found cooling on kitchen counters during weekends or served proudly at family gatherings. The beauty of marble cake lies in its balance, the comforting sweetness of vanilla paired with the bold richness of chocolate, perfectly blended yet still distinct.
Despite its elegant appearance, marble cake is surprisingly simple to make. The secret isn’t complicated techniques or fancy ingredients, it’s about layering flavors and creating those signature swirls that make the cake both visually stunning and delicious.
Whether you’re baking for guests, celebrations, or simply craving a cozy homemade treat to enjoy with tea or coffee, marble cake delivers both flavor and nostalgia in every slice.
Ingredients You’ll Need
For the Cake
• 2 ½ cups all-purpose flour
• 2 ½ teaspoons baking powder
• ½ teaspoon salt
• ½ cup unsalted butter (room temperature)
• 1 ½ cups granulated sugar
• 4 large eggs (room temperature)
• 1 cup milk
• 2 teaspoons vanilla extract
• ¼ cup unsweetened cocoa powder
• ¼ cup boiling water
Kitchen Tools
• Mixing bowls
• Electric mixer or whisk
• 9×13 inch baking pan or bundt pan
• Spatula
• Knife or skewer (for marbling)
• Cooling rack
How to Make Marble Cake
1. Preheat and Prepare Your Pan
Preheat your oven to 175°C / 350°F. Grease and lightly flour your baking pan or bundt pan. For extra protection against sticking, line the bottom with parchment paper.
This preparation step ensures your cake releases cleanly and keeps the beautiful marbled structure intact.
2. Prepare the Vanilla Batter
Start by building the base batter that will form both the vanilla and chocolate layers.
In a bowl, whisk together flour, baking powder, and salt. This helps evenly distribute the leavening agents and ensures a consistent cake texture.
In a separate large bowl, cream the butter and sugar together until pale, light, and fluffy. This process incorporates air into the batter, which helps produce a soft and tender cake crumb.
Add eggs one at a time, mixing thoroughly after each addition. Stir in the vanilla extract.
Gradually add the flour mixture and milk alternately, beginning and ending with flour. Mix gently until the batter is smooth and fully combined. Avoid overmixing, as this can make the cake dense instead of soft.
3. Prepare the Chocolate Batter
In a small bowl, combine the cocoa powder with boiling water. Stir until a smooth, glossy chocolate paste forms.
The hot water intensifies the cocoa flavor and helps dissolve the powder evenly, creating a richer chocolate taste.
Take about half of the vanilla batter and fold it into the chocolate mixture until fully combined. You should now have two batters, one vanilla and one chocolate.
4. Create the Signature Marble Effect
Now comes the fun and artistic part.
Spoon alternating layers of vanilla and chocolate batter into the prepared pan. Don’t worry about perfection, uneven spoonfuls actually create more interesting swirl patterns.
Using a knife or skewer, gently swirl through the batter in loose figure-eight motions. The key is to swirl lightly. Overmixing will blend the batters completely, causing you to lose the marbled design.
The goal is to create visible ribbons of chocolate and vanilla throughout the cake.
5. Bake the Cake
Place the cake in the oven and bake for 45–55 minutes, or until a toothpick inserted into the center comes out clean or with just a few moist crumbs.
As the cake bakes, the swirled batters expand and set, locking in the beautiful marble pattern.
Allow the cake to cool in the pan for about 15 minutes before transferring it to a wire rack to cool completely. This helps prevent breakage and preserves the cake’s structure.
6. Optional Glaze or Frosting
Marble cake is delicious on its own, but you can elevate it further with simple toppings:
• Light dusting of powdered sugar for a classic finish
• Chocolate ganache drizzle for extra indulgence
• Vanilla or chocolate buttercream for celebrations
• Simple sugar glaze for a bakery-style presentation
Tips for Perfect Marble Cake
• Use room temperature ingredients for smoother mixing and better cake rise
• Avoid over-swirling to maintain distinct chocolate and vanilla streaks
• Use high-quality cocoa powder for richer chocolate flavor
• Let the cake cool completely before slicing for clean, defined marble patterns
• Gently tap the pan before baking to remove air pockets
Fun Variations
Double Chocolate Marble Cake : Use melted dark chocolate instead of cocoa powder for a deeper, richer chocolate layer.
Coffee Marble Cake : Add espresso powder to the chocolate batter to enhance the chocolate notes and create a mocha-inspired cake.
Nutty Marble Cake : Fold chopped walnuts, pecans, or hazelnuts into the batter for added crunch and flavor depth.
Citrus Vanilla Marble Cake : Add orange or lemon zest to the vanilla batter for a fresh aromatic twist.
Marble cake is a beautiful reminder that contrast can create harmony. The delicate sweetness of vanilla paired with bold chocolate richness creates a cake that feels both comforting and sophisticated.
Beyond its visual appeal, marble cake offers versatility. It can be dressed up with frosting for celebrations or served simply with tea or coffee for a relaxed homemade dessert. It’s the kind of cake that feels nostalgic yet never goes out of style.
Once you master the marbling technique, this recipe becomes incredibly rewarding, every slice tells its own story through swirls of flavor and texture. It’s proof that sometimes the most memorable desserts come from simple ingredients brought together with a little creativity and care.